I am interested in a general sense about how people go about painting figures and scenery. I don't mean specific individual techniques like washes or drybrush, but descriptions of the overall process, as a whole.
Following is a list of my current understanding (or perhaps my misunderstanding) of some of the processes available. I am assuming people start with basic prep of some kind, washing, priming, trimming flash or whatever is needed for the type of model, so I left those out.
The names are either made up by me or what I have found others to call them. I am happy to hear if there are better known formal names for any of them. Of course, these divisions are artificial and real painters will frequently combine them in various ways.
Some Techniques:
1) Basic base colors only. This is what I started with back in the day, learning to paint on my own.
2) Base/Wash/Drybrush Starting with base colors like #1 and building up shading by one or more applications of washing and drybrushing, in any order. I learned this at a workshop at Origins (or maybe GenCon, can't remember) many many moons ago, from a great guy named Joe Miceli who was a game and rules designer and also on staff for the late, great Courier Magazine. This is still what I am most familiar with.
3) Sketch Painting Monochrome shading topped with glazes or washes to add hues. I guess zenithal priming could be considered a specialized subset of this technique.
4) Dark to Light Starting with a very dark base coat (or very dark primer) layering on successively lighter layers of paint. There is a paint company (can't remember which, anyone know them) that promotes a version of this and providing various triads of colors (i.e. dark red, medium red and bright red) to make color selection easy (and expensive). I have been experimenting with this a bit, the layering, not the pre-selected triads, and like it so far.
5) Stain Painting This is, if I remember correctly, an all-wash technique and was promoted in the late 70s-early 80s (I think) by Heritage Miniature's Duke Seifried, of Der Kreigspielers fame, as a "fast" method of preparing tabletop quality armies. Citadel Contrast Paints (if used as the sole paint) seem to be a technological update of this--when Duke was evangelizing stain painting, a wash was just thinned-down hobby paint. The main difference between this and sketch painting, to my mind, is that stain painting tends to "shade as the paint flows" making concavities dark and convex areas light whereas in sketch painting, dark and light are more according to the painter's intentions, frequently simulating light coming from above.
That's my current thinking. Have I left anything out, blurred any lines, offended any higher powers? How do you paint? Does it fit into, or overlap any of these categories, or do they lack relevance to your techniques?
Thanks!
General
Painting Meta Techniques?
16 posts
• Page 1 of 1
-
Pocho Azul
- Posts: 72
- Member since:
23 Jan 2021, 02:11
Another way is to prime black and leave a very thin black line between each transition area. Don't know what it would be called. Good way to have details pop out.
-
Bluefalchion
- Posts: 3575
- Member since:
23 Dec 2010, 07:57
Another way is to prime black and leave a very thin black line between each transition area. Don't know what it would be called. Good way to have details pop out.
That kind of sounds like a variation of what I called "Dark to Light", except I failed to mention that outlining could be a benefit (if you have very steady hands). The paint company that promotes their version of this, by the way, is Wargames Foundry and calls it the "Foundry System". Their house paint guru, Kevin Dallimore, is a good example of using this technique, including the thin back lines. For example:
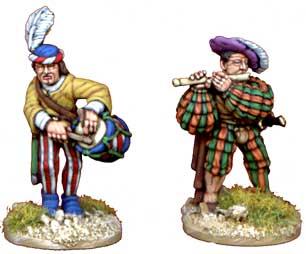
I think it is not really necessary to buy their paints to paint this way, as long as you are comfortable mixing colors. I am going to try it out on my next batch of figures, except on something a lot simpler than these landsknecht.
-

Pocho Azul
- Posts: 72
- Member since:
23 Jan 2021, 02:11
Bluefalchion wrote:Don't know what it would be called.
Blacklining?
Some people use pencil to do it.
-

Kekso
 Moderator
 Supporting Member (Bronze)
 - Posts: 6883
- Member since:
19 Oct 2011, 18:32
I was referring to a black base, then you paint each item, hat, sword, boot, glove, but only up the the edge, allowing a black line to remain.
-

Bluefalchion
- Posts: 3575
- Member since:
23 Dec 2010, 07:57
Bluefalchion wrote:I was referring to a black base,
I wasn't sure. That's why I left question mark intentionally. Thanks.
-

Kekso
 Moderator
 Supporting Member (Bronze)
 - Posts: 6883
- Member since:
19 Oct 2011, 18:32
Help keep the forum online!
or become a supporting member
This is my little contribution:
I use an enamel beige colour as primer. Then I spray with a walnut woodstain varnish, bought from a hardware store. The result is like this:
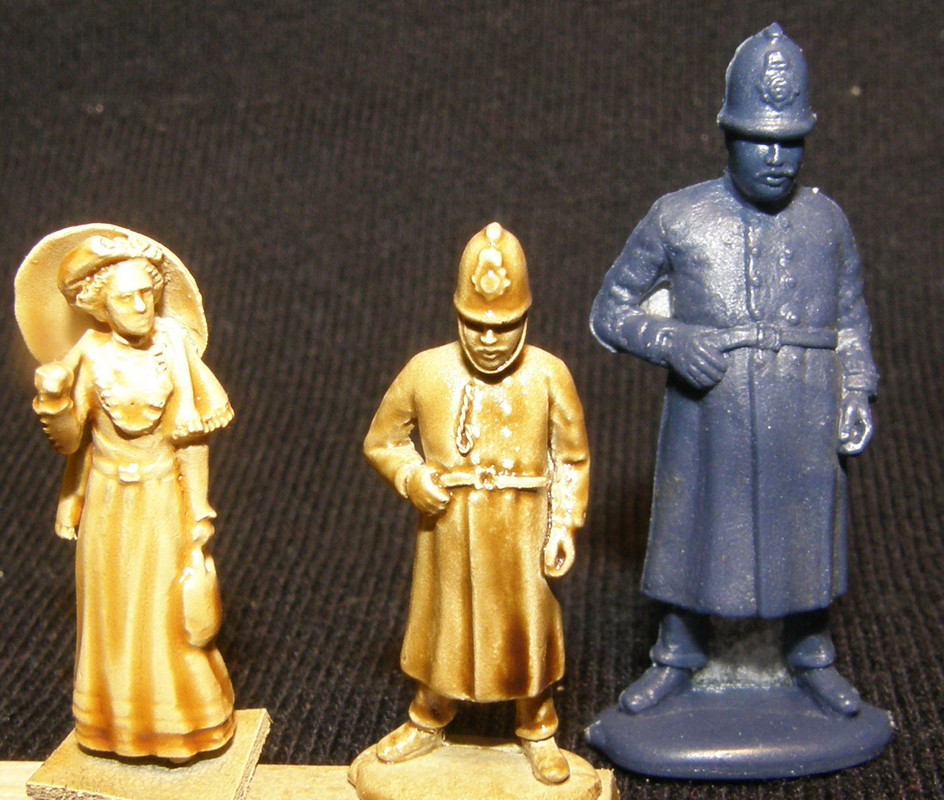
This way I can understand how to highlight my figure.
Next step is the flesh parts. I use the Shep Paine's technique for bigger figures. Kinda similar Kekso's tutorial. In this step i use exclusively oil colours.
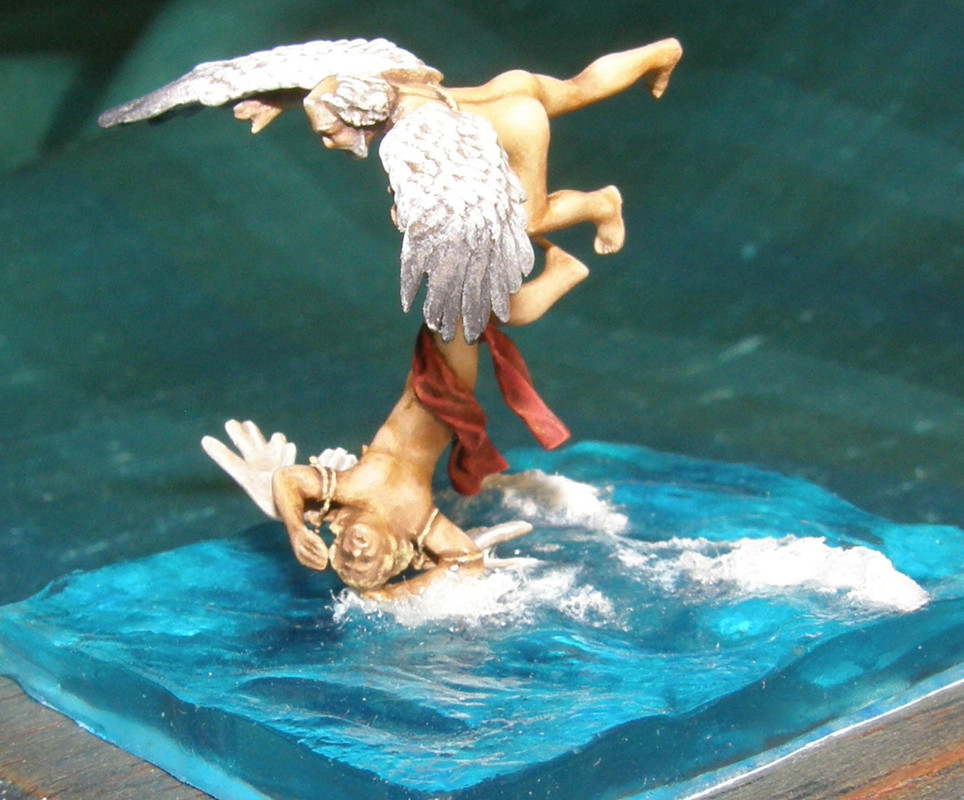
I use enamel and oils for the rest of the figure. For the light colours I take advantage of the pre shading with the wood varnish, by making the colours almost transparent like washes. Here I go from "dark to light", using oils.
Dark colours now:
For red I cover the hole area with red oil and then I wip most of it with a brush. It is transparent now and the pre shading is helpfull again. Some extra love is needed with yellow oil on the peaks.
For blue I prime over with white enamel, then I paint blue oil, I wip it and finally I highlight with white.
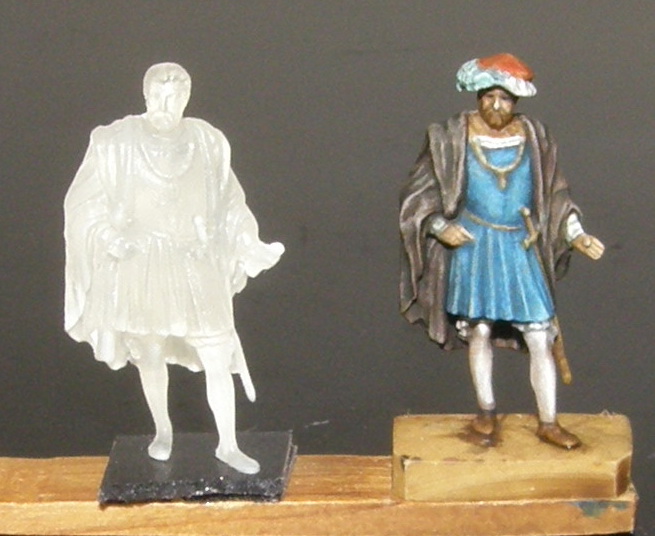


I use an enamel beige colour as primer. Then I spray with a walnut woodstain varnish, bought from a hardware store. The result is like this:

This way I can understand how to highlight my figure.
Next step is the flesh parts. I use the Shep Paine's technique for bigger figures. Kinda similar Kekso's tutorial. In this step i use exclusively oil colours.

I use enamel and oils for the rest of the figure. For the light colours I take advantage of the pre shading with the wood varnish, by making the colours almost transparent like washes. Here I go from "dark to light", using oils.
Dark colours now:
For red I cover the hole area with red oil and then I wip most of it with a brush. It is transparent now and the pre shading is helpfull again. Some extra love is needed with yellow oil on the peaks.
For blue I prime over with white enamel, then I paint blue oil, I wip it and finally I highlight with white.

-

Kostis Ornerakis
In memoriam- Posts: 1280
- Member since:
14 Feb 2016, 18:16
I don't think I could ever paint that way, Kostis. But I am very glad you do. Thanks for sharing a tiny hint for your process. The results speak for themselves, and quite eloquently.
-

Bluefalchion
- Posts: 3575
- Member since:
23 Dec 2010, 07:57
If I might add a few thoughts...?
My painting styles/techniques depend on a couple of things
Dark colours - black.
Metals - black.
If I am really impatient I sometimes don't base coat at all - it has been done.
The most common technique I use is a base coat (as above), main colours blocked in, wash (usually a dark wash), the main colours again followed by a highlight. Sometimes a second or even a third was may be used to define details if i think they need it. I find this touches all the areas I need to get what I want for the end result.
If neccessary I then go on and do the detail work.
Also useful is thining colours with a medium to give translucent tone.
With some dark colours - especially when batch painting dry-brushing is the essential tool, metals, dark cloth and furs.
Recent experiments with a wet pallette ave been very successful but I only see it as being used for individual figures or snakk numbers if figures 3 or 4 at a time.
Some paint jobs I am particularly pleased with:
Using a white base and colours thinned with a gel medium (GWs Lamian Medium) to get an ethereal effect.

These skeletons have had successively lighter dry-brushes over a darker base, which was washed first to deepen the detail.

Lighter shades over flesh, a solid red as the 'spot colour', metals over a black base, and dry brushing over black for the hair. The details like tattoos etc are about as fine as I can get these days.

When doing the groundwork for figure bases, I read once that a lighter coloured base compliments the figure better than a dark one. With this in mind, because most (if not all) of my figures are wargames figures and to keep a consistency through out my collection I use an ochre painted base for my figures, drybrushed with sand or white to lighten it up. This is aiming at a dusty dry-ground effect. Any 'vegetation' will reflect the army back story. Eg the skeletons and undead above have come out of the dead northern wastelands so the the dead vegetation and dry grasses reflect this. Consistent basing also ties an army together and gives it identity.
My painting styles/techniques depend on a couple of things
- 1. I am usually batch painting - 6s or 12s, sometimes even more.
2. I am a very impatient painter - I want the damn things done and will use the quickest most effective methods to achieve this.
3. Since I was diagnosed with Type 2 Diabetes my attention span rivals that of a goldfish, unless my blood sugars are spot on.
4. Physical limitations these days - eye sight and dexterity.
5. I'm not tied to any particular style of painting and will combine methods to reach the desired effect.
Dark colours - black.
Metals - black.
If I am really impatient I sometimes don't base coat at all - it has been done.
The most common technique I use is a base coat (as above), main colours blocked in, wash (usually a dark wash), the main colours again followed by a highlight. Sometimes a second or even a third was may be used to define details if i think they need it. I find this touches all the areas I need to get what I want for the end result.
If neccessary I then go on and do the detail work.
Also useful is thining colours with a medium to give translucent tone.
With some dark colours - especially when batch painting dry-brushing is the essential tool, metals, dark cloth and furs.
Recent experiments with a wet pallette ave been very successful but I only see it as being used for individual figures or snakk numbers if figures 3 or 4 at a time.
Some paint jobs I am particularly pleased with:
Using a white base and colours thinned with a gel medium (GWs Lamian Medium) to get an ethereal effect.

These skeletons have had successively lighter dry-brushes over a darker base, which was washed first to deepen the detail.

Lighter shades over flesh, a solid red as the 'spot colour', metals over a black base, and dry brushing over black for the hair. The details like tattoos etc are about as fine as I can get these days.

When doing the groundwork for figure bases, I read once that a lighter coloured base compliments the figure better than a dark one. With this in mind, because most (if not all) of my figures are wargames figures and to keep a consistency through out my collection I use an ochre painted base for my figures, drybrushed with sand or white to lighten it up. This is aiming at a dusty dry-ground effect. Any 'vegetation' will reflect the army back story. Eg the skeletons and undead above have come out of the dead northern wastelands so the the dead vegetation and dry grasses reflect this. Consistent basing also ties an army together and gives it identity.
-
steve_pickstock
- Posts: 1342
- Member since:
20 Jun 2010, 19:56
steve_pickstock wrote:My painting styles/techniques depend on a couple of things2. I am a very impatient painter - I want the damn things done and will use the quickest most effective methods to achieve this.
3. Since I was diagnosed with Type 2 Diabetes my attention span rivals that of a goldfish, unless my blood sugars are spot on.
4. Physical limitations these days - eye sight and dexterity.
5. I'm not tied to any particular style of painting and will combine methods to reach the desired effect.
Thanks for this funny and honest description of your way of painting.

-

MABO
 Supporting Member (Gold)
 - Posts: 9170
- Member since:
12 May 2008, 18:01
Btw: I really like your undead woman. Can you tell me who made her, please?
-

MABO
 Supporting Member (Gold)
 - Posts: 9170
- Member since:
12 May 2008, 18:01
Previously I used a basic/wash/highlight method. It works well for some colors, but the edges are always a bit messy.
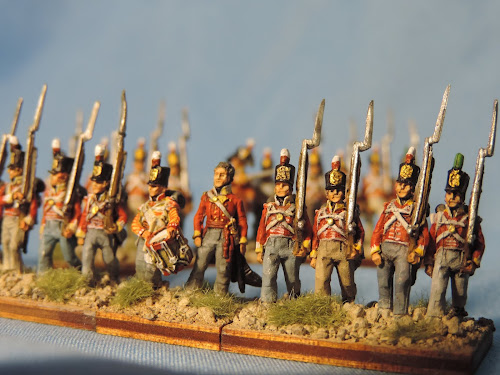
Recently I started using a basic paint + edge-with-a-black-wash method, which is much cleaner. I think I may combine the two approaches in the future.
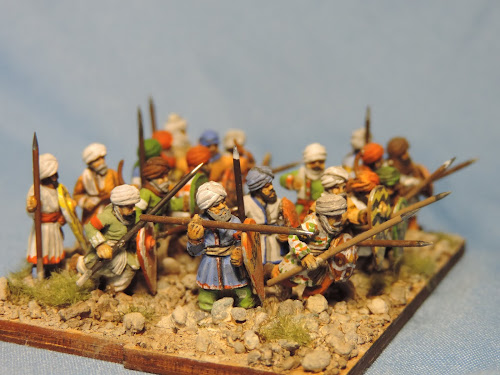
But there are exceptions, such as painting detailed cloaks, camouflage patterns, and shields. For this I usually use just a basic layer + details, as shading just hides some of the finer patterns.
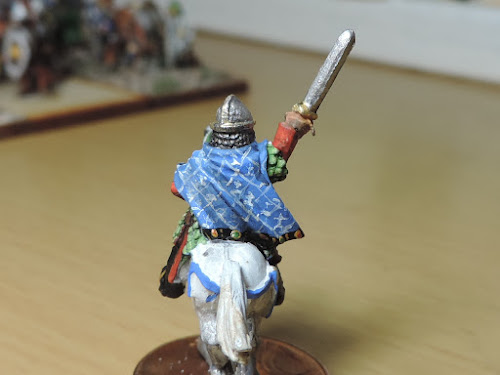
Recently I started using a basic paint + edge-with-a-black-wash method, which is much cleaner. I think I may combine the two approaches in the future.
But there are exceptions, such as painting detailed cloaks, camouflage patterns, and shields. For this I usually use just a basic layer + details, as shading just hides some of the finer patterns.
-
Ben Bob
- Posts: 801
- Member since:
28 Jan 2012, 03:22
MABO wrote:Btw: I really like your undead woman. Can you tell me who made her, please?
Thank you.
The figure is a Games Workshop Sorceress
https://www.games-workshop.com/en-GB/Dark-Elf-Sorceress
The only change I made to her was to cut her left arm at the wrist and rotate the hand so that the palm was upwards. I wanted to make her look like she was dragging the dead up from their resting places.
She was inspired by this video for the computer game Hellblade 2
https://youtu.be/2TR0gaG01do
-

steve_pickstock
- Posts: 1342
- Member since:
20 Jun 2010, 19:56
steve_pickstock wrote:Thank you.
The figure is a Games Workshop Sorceress
https://www.games-workshop.com/en-GB/Dark-Elf-Sorceress
The only change I made to her was to cut her left arm at the wrist and rotate the hand so that the palm was upwards. I wanted to make her look like she was dragging the dead up from their resting places.
She was inspired by this video for the computer game Hellblade 2
https://youtu.be/2TR0gaG01do
If you cut off her wrist, I doubt she minded. Being undead and all.
-

Bluefalchion
- Posts: 3575
- Member since:
23 Dec 2010, 07:57
Bluefalchion wrote:
Ah, in the back story for this army Danthe the Necromancer is the only one who is actually alive. All the rest - the wraiths, the skeletons, the vampire lords and their thralls, all dead. Though if she keeps getting her hands cut off who knows?
-

steve_pickstock
- Posts: 1342
- Member since:
20 Jun 2010, 19:56
steve_pickstock wrote:Thank you.
The figure is a Games Workshop Sorceress
https://www.games-workshop.com/en-GB/Dark-Elf-Sorceress
The only change I made to her was to cut her left arm at the wrist and rotate the hand so that the palm was upwards. I wanted to make her look like she was dragging the dead up from their resting places.
She was inspired by this video for the computer game Hellblade 2
https://youtu.be/2TR0gaG01do
Thanks Steve!!

-
steve_pickstock likes this post. •
- Reply
-

MABO
 Supporting Member (Gold)
 - Posts: 9170
- Member since:
12 May 2008, 18:01
Help keep the forum online!
or become a supporting member
16 posts
• Page 1 of 1
